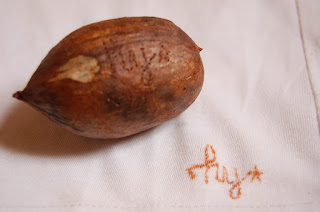
The parenthetical "ice cream" phrase on that shirt was printed using -- that's right -- the pit (seed) of an avocado. Avocado pits have some rust-colored juice inside them that can stain most fabrics. Using a needle, I took advantage of this stain to 'print' on my old t-shirt. Yep, that's all-natural ink right there.
I can proudly say that this handicraft has been passed on to me by my lola and my Mama (God bless her soul). They used to print my name onto my baby blankets using this technique, and I grew up watching them do this to our kiddie clothes for a personal touch.
Believe me, I tried looking up this process online, but all I could find were stamping techniques. So, it's time I share this super-easy and pretty cool technique to the shirt-altering world.
The only things you'll need are...
- a light-colored shirt (of cotton or a similar fabric)
- a pencil
- an avocado pit -- wash away the last bits of flesh and let the seed dry completely
- a small needle.
First, spread out your shirt on a flat surface and lightly sketch your design on it using the pencil. You probably want to draw on the reverse side (inside) of the shirt, but since my design was text and I was too lazy to write backwards, I drew on the front (outside) instead. No worries -- that's why I used a handy-dandy pencil.
After you've finished sketching, take your avocado pit and place it inside the shirt. Position it right beneath one section of your sketched design, then using your hands, bunch the cloth tight under the seed to entirely cover it.
Now it's time to start piercing! Take your needle and start piercing along your sketched design on the cloth on top of the avocado pit. Ever heard of Pointillism? It's a painting technique where the artist uses lots and lots of paint dots to create one whole picture. It's the same concept here: you'll want to 'print' your design using tiny dots of juice.
So when piercing, make sure to pierce the seed underneath the cloth, too, so you punch a teeny-tiny hole on it and some of the colored juice come out with each pierce.
As you pierce along, you should see some of the juice starting to stain where you've pierced. See that faint rust-colored curve here?
It will take about a minute or two for the stain to turn really bright. So keep piercing along your design and you'll see the change.
If your design is large, just move the avocado pit underneath to accommodate your piercing. You can pierce the same seed over and over again, but for brightest results, try to use an unpierced part of it each time you move.
With a little patience, you'll finish piercing your entire design. Erase pencil marks as necessary, and voilà -- you've got a fresh new print on your shirt!
It's okay to wash your printed shirt with a mild detergent. Wash it gently and lovingly, and wear it for comfort, like you would a baby blanket. :)


3 comments:
Thanks I remember my parents doing this to my clothes as a child. I'm glad that I was not remembering it wrong
You're welcome! Had to test out my memory, too. It's so easy, I almost thought I had forgotten a magic ingredient or something. :)
https://soulpersonified.blogspot.com/2012/03/shirt-printing-avocado.html?sc=1715261372090#c6633584418169786029
Post a Comment